Beginner's Guide to Copper Pipe Bending and Flaring Tools

If you're tackling plumbing or HVAC projects, mastering copper pipe bending and flaring is a game-changer. These skills let you shape copper pipes to fit tight spaces and create secure, leak-free connections. With the right copper pipe bending tool and a bit of practice, you can handle these tasks like a pro.
Don't worry if you're just starting out. Everyone begins somewhere, and learning these techniques is easier than you think. Take it step by step, and you'll soon feel confident working with copper pipes in your projects.
Key Takeaways
Learning to bend and flare copper pipes saves time. It also helps prevent leaks and makes systems work better.
Use proper tools for bending and flaring pipes. Lever benders are easy for beginners. Ratcheting benders work well for bigger pipes.
Measure and mark pipes before bending them. This avoids errors and gives neat, professional results.
Always remove sharp edges before flaring. This helps seal tightly and stops leaks in connections.
Practice often to get better. Use scrap pipes to gain confidence and improve your skills.
Understanding Copper Pipe Bending and Flaring
What is Copper Pipe Bending?
Copper pipe bending is the process of shaping copper tubing to fit specific layouts or designs. Instead of relying on multiple fittings and joints, you can bend the pipe to create smooth curves. This technique is especially useful in tight spaces or when you need to follow a precise path.
You’ll often see bent copper pipes in:
Plumbing systems, where fewer joints mean fewer potential leaks.
HVAC systems, where bends optimize space and improve efficiency.
Laboratory setups, where precision and reliability are critical.
By bending copper pipes, you can reduce the need for extra fittings, which saves time and ensures a cleaner, more efficient system.
What is Copper Pipe Flaring?
Flaring involves expanding the end of a copper pipe to create a cone-shaped opening. This flared end connects securely to another pipe or fitting, forming a tight, leak-proof seal. It’s a common technique in plumbing, HVAC, and refrigeration systems.
Flaring is essential when you’re working with pressurized systems. The flared connection ensures durability and prevents leaks, even under high pressure. Whether you’re installing a water line or setting up a cooling system, flaring helps you achieve a reliable connection.
Why Are These Techniques Important?
Bending and flaring copper pipes aren’t just about aesthetics—they’re about performance and durability. Bent pipes minimize joints, reducing weak points and the risk of leaks. This also leads to quieter systems with smoother water flow and less turbulence.
Flaring, on the other hand, ensures secure connections that can withstand pressure. Together, these techniques improve the efficiency of plumbing and HVAC systems while extending their lifespan.
Copper’s natural properties, like corrosion resistance and malleability, make it ideal for bending and flaring. By mastering these skills, you can create systems that are not only functional but also built to last.
Essential Copper Tube Bending Tools and Flaring Tools
When working with copper tubing, having the right tools makes all the difference. Whether you're bending pipes to fit tight spaces or flaring them for secure connections, the right equipment ensures precision and efficiency. Let’s explore the essential tools you’ll need.
Tools for Bending Copper Tubing
Lever Type Benders
Lever type benders are perfect for small-diameter copper tubing, typically ranging from ¼” to 3/8” outer diameter (OD). These tools use manual leverage to create smooth, accurate bends. They’re lightweight and easy to handle, making them a great choice for beginners.
Ratcheting Benders
If you’re working with larger copper tubing (up to 1 1/8” OD), ratcheting benders are your go-to tool. They provide greater control and precision, allowing you to create consistent bends without much effort. These are ideal for more demanding projects where accuracy is key.
Spring Tube Benders
Spring tube benders are a simple yet effective option for preventing kinks during manual bending. You slide the spring over the copper tubing, and it supports the pipe as you bend it by hand. This tool is especially useful for delicate or thin-walled tubing.
Here’s a quick comparison of common bending tools:
Tool Type | Functionality Description |
|---|---|
Lever Type Tube Bender | Suitable for small diameters (¼”, 5/16”, 3/8” OD); requires manual leverage to bend. |
Ratcheting Type Bender | Handles larger sizes (3/8” to 1 1/8” OD); allows for controlled and precise bends. |
Spring Tube Bender | Prevents kinking during manual bending, especially for delicate tubing. |
Tools for Flaring Copper Tubing
Single and Double Flaring Tools
Flaring tools are essential for expanding the ends of copper tubing. Single flaring tools create a basic flare, while double flaring tools add an extra layer of reinforcement. Double flares are often used in high-pressure systems for added durability.
Tubing Cutters and Deburring Tools
Before flaring, you’ll need to cut the copper tubing to the desired length. Tubing cutters provide clean, precise cuts, while deburring tools remove sharp edges and burrs. This ensures a smooth surface for flaring and prevents leaks.
Additional Accessories
Measuring Tools
Accurate measurements are crucial when working with copper tubing. A good tape measure or ruler helps you mark the exact length and bend points. This minimizes errors and ensures a professional finish.
Safety Gear
Safety should always come first. Equip yourself with:
Gloves to protect your hands from sharp edges.
Safety glasses to shield your eyes from flying debris.
A dust mask to avoid inhaling fine particles.
Tip: Keep your workspace clean and well-lit. Organize your tools within easy reach to work efficiently and safely.
With these tools and accessories, you’ll be well-prepared to tackle any copper tubing project with confidence.
Step-by-Step Guide to Using a Copper Pipe Bending Tool
Preparing the Pipe
Measuring and Marking
Before you start bending, preparation is key. Follow these steps to ensure accuracy:
Use a ruler or tape measure to determine the exact length and location of the bend.
Mark the spot with a permanent marker. Double-check your measurements to avoid mistakes.
Clean the pipe ends with a wire brush or sandpaper to remove rough edges. This step ensures smooth bends and prevents damage.
Tip: Always account for the spring back of the pipe after bending. Copper pipes tend to return slightly to their original shape, so adjust your measurements accordingly.
Heating the Pipe (if necessary)
If the pipe feels stiff or you’re working in cold conditions, heating it can make bending easier. Use a blow torch to warm the area where the bend will occur. Apply heat evenly and avoid overheating, as this can weaken the copper. Let the pipe cool slightly before bending to maintain its integrity.
Bending Techniques
Using a Lever Type Bender
Lever type benders are great for beginners. Here’s how to use one:
Place the pipe into the bender, aligning the marked spot with the bending die.
Hold the handle firmly and apply steady pressure to bend the pipe.
Check the angle as you go to ensure accuracy.
Note: Lever type benders work best for small-diameter pipes. They’re a reliable choice for most home installation projects.
Using a Spring Tube Bender
Spring tube benders are simple but effective tools for preventing kinks. To use one:
Slide the spring over the pipe, positioning it at the bend point.
Bend the pipe slowly by hand, using consistent pressure.
Remove the spring once the bend is complete.
This method works well for delicate or thin-walled pipes, especially when you need smooth curves.
Avoiding Common Mistakes
Preventing Kinks
Kinks can ruin your pipe and waste time. To avoid them:
Fill the pipe with fine sand or salt before bending. This distributes the force evenly.
Use internal springs or mandrels for extra support.
Apply gradual, consistent pressure during the bend.
Ensuring Accurate Angles
Precision is crucial for a professional finish. Here’s how to get it right:
Mark the start and center of the bend clearly.
Use tools designed for copper pipe bending, like lever-type benders or ratcheting benders.
Maintain a bending radius of at least twice the pipe diameter to avoid deformation.
By following these tips, you’ll achieve smooth, accurate bends every time. With practice, you’ll master the use of copper tube bending tools and create flawless installations.
Step-by-Step Guide to Flaring Copper Tubing
Flaring copper tubing might seem tricky at first, but with the right steps and tools, you’ll get the hang of it quickly. Let’s break it down into simple, manageable steps.
Preparing the Pipe
Cutting and Deburring
Before you start flaring, you need to prepare the copper pipe properly. Here’s how:
Use a tubing cutter to make a clean, straight cut. Avoid using a hacksaw, as it can leave jagged edges.
Grab a deburring tool and remove any burrs or debris from the cut edge. This step ensures a smooth surface for flaring and prevents leaks.
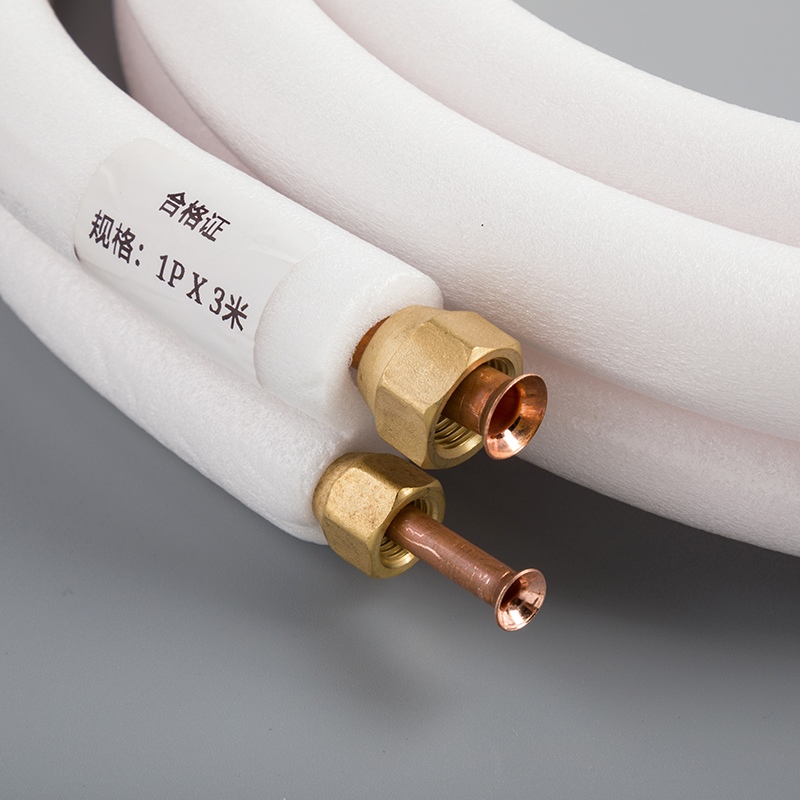
Slide the flare nut onto the pipe before you begin flaring. Forgetting this step means starting over, so double-check!
Tip: Always clean the pipe thoroughly before cutting to avoid debris entering the tubing. This small step can save you from future headaches.
Choosing the Right Flaring Tool
Using proper flaring tools is essential for a successful flare. Single flaring tools are great for basic tasks, but double flaring tools provide extra strength for high-pressure systems. Choose the tool that matches your project’s needs.
Flaring Techniques
Single Flaring
Single flaring is straightforward and works well for low-pressure systems. Follow these steps:
Insert the pipe into the die block, ensuring it’s flush with the surface.
Tighten the wingnuts to secure the pipe in place.
Position the yoke and cone above the pipe, then turn the handle to create the flare.
Double Flaring
Double flaring adds an extra step but creates a stronger connection. It’s ideal for high-pressure systems like HVAC or flaring copper water tubing. Here’s how:
Start with the same steps as single flaring.
After the initial flare, reposition the cone to fold the flare back onto itself.
Tighten the handle again to complete the double flare.
Feature | Single Flare | Double Flare |
|---|---|---|
Strength | Suitable for low-pressure systems | Stronger, ideal for high-pressure systems |
Steps | Involves one step | Involves two steps |
Durability | Less durable | More durable |
Ensuring Leak-Free Connections
Checking Alignment
To achieve leak-free connections, make sure the flared end aligns evenly with the tapered end of the fitting. Both ends should make tight, even contact. Misalignment can lead to leaks, so take your time with this step.
Tightening Properly
Slide the flare nut over the fitting and tighten it by hand. Then, use a wrench to secure it further. Be careful not to overtighten, as this can crack the flare. If you notice a leak, check that the flared end has a 45-degree angle and covers the fitting properly.
Pro Tip: Apply a drop of Nylog Blue to the threaded connection before tightening. It helps prevent leaks and ensures a secure fit.
By following these steps and using proper flaring tools, you’ll create strong, reliable connections every time. Practice makes perfect, so don’t hesitate to try flaring copper water tubing on scrap pieces before tackling your main project.
Troubleshooting Common Issues
Even with the right tools and preparation, you might run into some challenges when bending or flaring copper pipes. Don’t worry—these problems are common, and you can fix them with a little know-how. Let’s go over the most frequent issues and how to solve them.
Problems with Bending
Kinks or Cracks
Kinks and cracks can ruin your copper pipe and lead to leaks in your plumbing system. These issues often happen when the pipe isn’t supported properly during bending. To avoid this:
Use a spring tube bender or a mandrel to support the pipe.
Apply consistent pressure while bending to prevent sudden stress on the pipe.
If you notice kinks, try filling the pipe with fine sand before bending. This distributes the force evenly and keeps the pipe’s shape intact.
Incorrect Angles
Getting the wrong angle can throw off your entire project. This usually happens when measurements are off or the pipe shifts during bending. To fix this:
Double-check your measurements and mark the pipe clearly before bending.
Secure the pipe firmly in the bender to prevent movement.
Compensate for springback by slightly overbending the pipe.
Tip: Always inspect your bending tool for damage. A worn-out tool can cause rippling or uneven bends.
Problems with Flaring
Uneven Flares
Uneven flares can lead to poor connections and leaks. This often happens when the pipe isn’t cut or deburred properly. To avoid this:
Use a high-quality tubing cutter for clean cuts.
Deburr the pipe thoroughly to remove sharp edges.
Make sure the pipe is flush with the flaring tool’s surface before starting.
Leaks at Connections
Leaks at flared connections are frustrating but fixable. They’re usually caused by over-flaring or misalignment. Here’s how to address them:
Use a flaring block with depth stoppers to prevent over-flaring.
Check that the flared end aligns perfectly with the fitting.
Tighten the flare nut carefully—too much force can crack the flare.
Pro Tip: For hard copper, anneal the pipe before flaring. This softens the material and reduces the risk of cracking.
Fixing Mistakes
Re-bending Pipes
If a bend doesn’t turn out right, you can often fix it by re-bending the pipe. Heat the area gently with a blow torch to make the copper more pliable. Then, use your bending tool to correct the angle. Be careful not to overheat, as this can weaken the pipe.
Re-flaring Pipes
A bad flare doesn’t mean you need to scrap the pipe. Cut off the damaged section and start fresh. Remember to deburr the new edge and slide the flare nut onto the pipe before flaring again. Practice on a scrap piece if you’re unsure about your technique.
By addressing these common issues, you’ll improve your skills and create plumbing connections that are both durable and leak-free. Mistakes happen, but with patience and practice, you’ll master the art of working with copper pipes.
Mastering copper pipe bending and flaring is a valuable skill for plumbing and HVAC projects. It minimizes the need for fittings, reduces potential leaks, and ensures efficient fluid or gas flow. Plus, it gives your installations a polished, professional look that clients will appreciate.
If you’re just starting out, don’t worry. Practice is the key to building confidence. Use tools like a flaring kit or a copper tubing cutter to get precise results. Always wear safety gear, mark your measurements carefully, and apply steady pressure to avoid kinks or cracks. These small steps make a big difference in achieving smooth bends and secure connections.
With time, you’ll enjoy the long-term benefits of these techniques, like better energy efficiency and greater flexibility in design. So grab your tools and start practicing—you’ve got this!
FAQ
What’s the best way to cut copper tubing?
Using a proper tubing cutting tool is the easiest and most precise method. A tubing cutter ensures clean, straight cuts without damaging the pipe. Avoid using hacksaws, as they can leave jagged edges that are hard to deburr.
Can I bend copper pipes without special tools?
Yes, but it’s tricky. You can use a spring tube bender or fill the pipe with sand to prevent kinks. However, specialized tools like lever-type benders make the process much easier and more accurate.
How do I know if my flare is done correctly?
A good flare should have a smooth, even surface and fit snugly against the fitting. Check for a 45-degree angle and ensure there are no cracks or uneven edges. Tighten the flare nut gently to avoid over-compression.
What’s the difference between flaring and swaging copper tubing?
Flaring expands the pipe’s end to create a cone-shaped opening for connections. Swaging copper tubing, on the other hand, enlarges the pipe’s diameter to fit another pipe inside it. Both techniques are useful for creating secure, leak-free joints.
Why is deburring important before flaring or bending?
Deburring removes sharp edges and burrs left by copper cutting tools. This step ensures a smooth surface, which is crucial for creating tight seals and preventing leaks. Skipping this step can lead to uneven flares or damaged pipes.
See Also
Essential Copper Pipe Flaring Tools Every DIYer Should Own
Selecting The Ideal Copper Pipe Flaring Tool For 1/2 Inch
Five Best Tools For Flaring Copper Pipes Effectively

© Copyright 2024 Dongguan Baoyuan Refrigeration Parts Co.,Ltd - All Rights Reserved.